
Using the Shared Speech Recognizer
The Shared Speech Recognizer is the input control that appears on the screen for giving voice commands and doing dictation in Windows and Microsoft Word.
Shared Recognizer listening states
Now that you have turned on Speech Recognition in the Control Panel and followed all the steps in Lesson 1, you’ll be able to access the Shared Recognizer when you launch Windows. Depending on how you have set the “Run Speech Recognition at startup” setting, the Shared Recognizer will appear on the screen, or it will be closed, but still available to click on in the System Tray at the bottom right of your screen.
The Share Recognizer has three states.
Off

In the Off state, the Shared Recognizer is complete off. It’s not listening to anything you say.
Sleeping
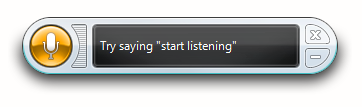
In the Sleeping state, the Shared Recognizer is listening, but not active. There is only one thing it is listening for: “start listening”. Say that, or click it to wake up the Shared Recognizer.
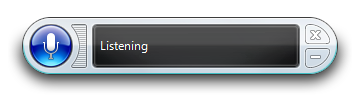
Listening
In the Listening state, not only is the Shared Recognizer listening, it’s actively trying to do what you tell it to do. It will take everything you say and interpret it as a command, or dictation. The choice depends on which application or window is open.
To put it back to sleep, just say “stop listening” or give it a click with our mouse.
Warning
Be careful about the state of the Shared Recognizer! If you are working in Microsoft Word and forget that it’s on, you can get unintended, random text entered into your document. So always say “stop listening” when you take a break from dictation.
Tip
When you pause during dictation, it’s a good idea make sure no text is selected. A sneeze could replace your selected text with a random word and you will lose it. Of course, you can always say, “undo that”. But only if you see what happened.
Error Messages
If you say something the Shared Recognizer doesn’t understand, you will hear a beep and see a message displayed inside the Shared Recognizer.
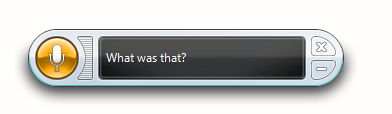
When you see this, you know that what you said was not understood, and that the Shared Recognizer did not perform any actions.
When the Shared Recognizer can interpret your phrase as a command or as dictation, it will take the appropriate action (like select a word), or it will enter the speech to text into your document. No messages are given. You need to look at your document to confirm the speech to text was entered correctly.
Voice Commands
When you want to know what kinds of commands you can use with the Shared Recognizer, say this:
“What can I say?”
A window will open, called the Speech Reference Card, with a list of some of the commands that are available. The format of the list you see depends on the version of Microsoft Windows you are using. However the contents are the same.
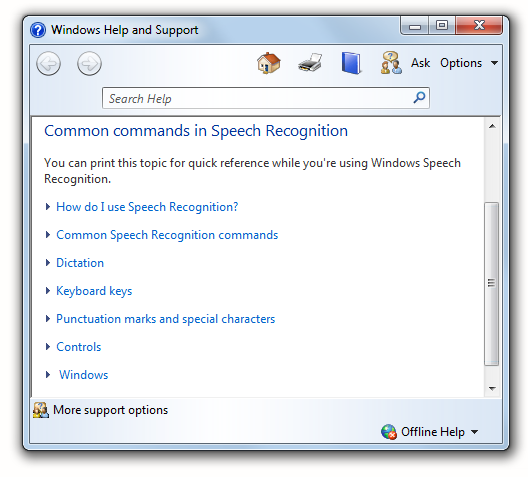
There are numerous commands you can use to control Windows. And you can see them in the Speech Reference Card.
Tip
This course doesn’t cover the system commands you can use with the Shared Speech Recognizer. The focus is on speech to text with Microsoft Word, which we’ll get to shortly in the next lesson. But you should take some time and become familiar with the system commands, as that will help you get even more use from the Speech Recognition system.
Speech Tools Users
With Speech Tools installed in Microsoft Word, you can still use the “What can I say?” command to see the Speech Reference Card. All the dictation commands work as usual. Speech Tools also has a Command List button that shows and expanded command list with many more dictation commands that are available to use in dictation, but are not listed in the Speech Reference Card.
Dual Writer Users
Dual Writer does not use the Shared Speech Recognizer. Dual Writer connects directly into the Windows Speech Recognition system. When using Dual Writer, saying “What can I say?” opens Dual Writer’s own custom list of dictation commands. Dual Writer’s command set is almost the same, with only a few differences, so you can easily use dictation with Dual Writer if you know the basic speech commands.
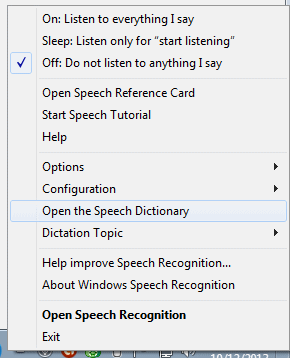
Shared Recognizer Context Menu Commands
You can click the Shared Speech Recognizer to change the mode from Sleeping to Listening. You can also right click the Shared Recognizer to see a context menu with additional commands.
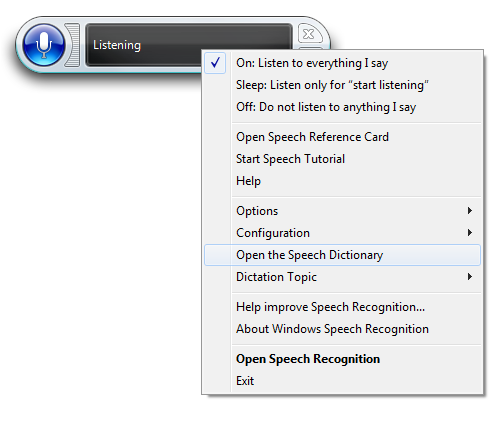
Most of the commands in the menu are ones that you have already seen in the Control Panel for setting up Speech Recognition. But there are some new ones here you may find useful.
On: Listen to everything I say
Check this option or say “start listening” to activate the Shared Speech Recognizer.
Sleep: Listen only for “start listening”
Check this option or say “stop listening” to put the Shared Recognizer into Sleep mode.
Off: Do not listen to anything I say
Check this box to turn off the Shared Recognizer. When you do this, you’ll need to click it again to turn it on. Saying “start listening” won’t work.
Turning off the Shared Recognizer is something you may want to do if your computer is busy with other tasks and you are not using speech to text. The Off mode uses somewhat fewer system resources than Sleep mode, because in Sleep mode, the Shared Recognizer is still actively listening for you to say “start listening”.
Open Speech Reference Card
Choose this option, or say “What can I say” to open the Speech Reference Card.
Start Speech Tutorial
This option launches the Speech Tutorial. It’s only available in Microsoft Windows Vista and Windows 7.
Help
Check this option to open the Windows help system.
Tip
If you have questions, you probably won’t find this too helpful. But you should become familiar with it.
Option > Play Audible Feedback
Checking this option will cause the Shared Speech Recognizer to beep when it provides feedback. So when you hear the beep, you’ll know that the Shared Recognizer has a message for you. The text message that is displayed is usually that it didn’t understand something you said.
Options > Run at Startup
Check this option to have the Speech Recognition system run automatically when you start up Windows, and display the Shared Speech Recognizer. This is convenient if you use voice commands to control Windows.
Options > Speak Text in Correction Dialog
This is a fun option that you may find useful for becoming better at doing dictation. As described in the lesson on Correcting Mistakes, you can say “correct that” to have the Speech Recognition system select the last phrase you spoke and show a list of replacement phrases. You can choose one of the replacement phrases, say the phrase again or just say “cancel”. It’s a fast way to make corrections and also helps the system learn your voice better.
When you check the Speak text in correction dialog option, the Speech Recognition system will play back your voice saying the phrase being corrected. You’ll hear yourself saying it. This feedback may help you to remember to speak clearly when doing speech to text, and improve the accuracy of the results.
Options > Enable dictation scratchpad
You’ll want to keep this option unchecked when doing dictation in Microsoft Word. When checked, it will place all your dictation in a small scratchpad window.
The purpose of the scratchpad is so that you can use dictation in Windows applications that do not directly support dictation. This allows you to speak into the scratchpad, make corrections, and then enter the final text into the application.
Tip
Remember – keep this this option unchecked in Microsoft Word!
Configuration > Set up my microphone
Choose this option to set up and configure your microphone.
Configuration > Improve voice recognition
This option takes you to the voice training in the Control Panel. This is the same voice training that you need to do when you first set up Speech Recognition.
You can’t do too much voice training. The voice training is critical for the system to get to know your voice, and you can do this again at any time, especially in the first few weeks that you are learning use dictation.
Tip
Just doing dictation in Microsoft Word helps the Speech Recognition system learn your voice and the vocabulary you use.
Configuration > Open Speech Recognition Control Panel
This option takes you to the Control Panel window for Speech Recognition.
Open the Speech Dictionary
Click on this option or say “open speech dictionary” to open the custom speech dictionary. Using the Speech Dictionary is covered later in the course.
Dictation Topic > Narrative
The Dictation Topic will only show one option: Narrative. That is, unless you have installed some custom speech programs that might show up here.
Tip
Don’t worry about this option. There is only one choice, so it’s not really an option at all.
Help Improve Speech Recognition
Do you want to hear what you sound like? Open this option, and at the bottom of the screen, click on the link to View copy of speech profile files that will be sent to Microsoft.
You’ll see a folder with audio files. Double click on one of them. That’s you!
If you feel like sharing your speech data with Microsoft, then click the Send button at the bottom of the window. Your contribution to Microsoft may help future users of the Windows Speech Recognition system.
About Windows Speech Recognition
This option shows the version number of the Speech Recognition system you are using.
Open Speech Recognition
This text will be bolded because the Speech Recognition system is already open.
Exit
Choose this option to completely exit the Speech Recognition system. This closes the program. To turn it back on, you will need to go to the Control Panel and select it.
If you have set the options to Run at Startup, then the Speech Recognition system will launch again next time you restart your computer.
The System Tray
At the bottom right corner of the screen is the system tray, an area in the task bar where icons are located for system programs and some application. The Speech Recognition system has an icon there, too.
![]()
You don’t need to worry about the Speech icon in the system tray, because all the features are available from the context menu in the Shared Speech Recognizer.
However, you can minimize the Shared Speech Recognizer to get it out of the way when you are not using it. Just click the minimize button.
To restore the Shared Speech Recognizer, just double click the Speech icon in the system tray.
Tip
You can also right click the Speech icon in the system tray to see the Speech context menu. But you won’t see a command there to maximize the Shared Recognizer. You just have to double click the icon.
Warning
It’s possible to minimize the Shared Speech Recognizer while it is still in Listening Mode! You can control it by voice commands while minimized as you usually do, but it is not visible on the screen.
![]()
When in listening mode, the Shared Recognizer icon is blue, and while in Sleep mode it is a lighter blue. It changes to gray when in Off mode.
So be careful when this happens so that stray dictation doesn’t get entered into your documents.
Shared Speech Recognizer screen location
There are voice commands you can use to manage the Shared Recognizer itself and its location on the screen. It must be in Listening mode for the commands to work.
Minimize the Recognizer
You can minimize the Shared Speech Recognizer by saying “minimize speech”, or “hide speech”.
Maximize the Recognizer
You can maximize the Shared Speech Recognizer by saying “maximize speech”, or “show speech”.
Moving the Shared Speech Recognizer
You can change the location of the Shared Speech Recognizer from the top of the screen to the bottom of screen by
saying “move Speech Recognizer to the bottom”. You can move it back by saying
“move Speech Recognizer to the top”. You
can toggle it from top to bottom and back again by simply saying “move speech recognition”.